KOSODE
MADE SIMPLE: The Essential Japanese Garment for the SCA Period.
This article exists to fill a perceived gap in Japanese portrayals in the SCA.
Yes, modern kimono are beautiful, but they're MODERN, and do not, in my mind,
constitute a reasonable attempt at pre-17th century dress. We can do so much
better, especially since a good number of 16th century garments have been
preserved, often having been handed down as theatrical costumes or bequeathed
to temples when the owner passed away. Links to several such garments on the
web appear at the end of this article. I also recommend hunting down Money
Hickman's Japan's Golden Age: Momoyama at the library or
bookstore as it contains a number of examples in full color, as well as
portraits of men and women from the period.


LEFT:
the author in 2004, in kosode, obi and uchikake. RIGHT: The author in 2020
in uchikake.
Many
of the characteristics of what Westerners associate with traditional Japanese
style developed after 1600. In fact the word "kimono," ("thing
to wear") evolved in the late 19th century as a way to differentiate
between Japanese and Western-style clothing. The kosode or "small
sleeve" refers to the small opening of the sleeve which differentiates it
from the big open sleeves of the layers of Heian (794-1172 CE) court robes worn
over it. The kosode was originally an undergarment which came out from under the
karaginu-mo during the Kamakura period (1172-1333 CE) and transitioned to
outerwear.
There
is already some excellent information available on the web for men at Sengokudaimyo.com. My own first attempts
at Japanese clothing were interpretations of Kamakura period clothing using
information from the "Reconstructing History" site, which
unfortunately is no longer posted there. Also invaluable is the Costume Museum in Kyoto,
where you can browse pictures of their collection by historical period as well
as a textile gallery which will help you in your quest for fabric that looks
right. (The Japanese language version of the site has
even more pictures).
 This project was
inspired by a visit from a friend in the spring of 2004. Fujimaki portrays a
16th century samurai in the SCA and I thought it would be nice to dress in a
style more compatible with his class and period (not to mention a bit more
field friendly) so that my Japanese persona could attend an outdoor event with
him. I already knew how to make the garments from my earlier projects as the
pieces get put together the same way. It was more a matter of learning about
stylistic differences of a later period.
This project was
inspired by a visit from a friend in the spring of 2004. Fujimaki portrays a
16th century samurai in the SCA and I thought it would be nice to dress in a
style more compatible with his class and period (not to mention a bit more
field friendly) so that my Japanese persona could attend an outdoor event with
him. I already knew how to make the garments from my earlier projects as the
pieces get put together the same way. It was more a matter of learning about
stylistic differences of a later period.
Japanese garments
are constructed based on the width of the fabric, or divisions thereof. Modern
kimono fabrics are woven at a standard width of 14", while 16" to
17" was the width of Japanese fabrics until very late in the 17th century.
How much difference can two or three inches make? When you consider that each
sleeve and body panel of a kosode or kimono uses one full width of fabric, plus
the half-width overlap panels in the front, you've just increased the size of
the robe by a factor of five.
Period Japanese silhouettes are far more imposing
than modern ones. The examples from the Kyoto Costume Museum below show a late medieval lady
of the samurai class and an Edo period (1603-1867 CE) city dweller. Note the
differences in not only the size and drape of the garments, but the width of
the obi (sash) and hairstyles. These wider garments are one way to look
physically impressive and display one's wealth or the favor of one's overlord
by conspicuous consumption of fabric. For those of us who weren't born
Japanese, the dimensions of period Japanese clothing will flatter those of us
who are larger than the average Japanese woman. Someone who saw me in kosode at
an event described me as "the slender lady in yellow" - and I'm a
size 16 on a good day.


The
samurai lady at left wears several kosode (at her neckline you can see at least
two layers under the white one) belted with a narrow brocade obi, and a brocade
uchikake (basically a bigger,
fancier kosode worn as a coat) over it. The seam where her sleeve meets the
shoulder of the garment hangs several inches below the shoulder, hinting that
the sleeve panel has been cut
narrower than the original fabric width. The bottoms of the sleeves are also
more curved than those of the Edo kimono on the right. The two men at right
wear kosode under their hakama
(trousers) and outer garments. The seated figure wears a dofuku (a coatlike
robe with open sided sleeves) and the man at the right wears a kataginu, an
open sided, sleeveless vest.
Below: Three 16th century ladies: Oichi no Kata, Oinu no Kata, Tosenin.
Underlayers are visible at the neckline, and the curving shapes of the sleeves
are particularly visible. Oichi (top left)
wears a kosode decorated at shoulders and hem as an inner layer. She and
Tosenin (bottom left) wear an uchikake wrapped around the waist. Oinu (bottom
top right) has draped her striped
uchikake low on her shoulders, the inner
kosode layers peeping out above. The curved sleeves are visible in all three
portraits, as are such classic marks of beauty as flowing hair, pale skin
and false eyebrows painted high on the forehead. Right: the author, wearing
kosode with uchikake wrapped at the waist.


Most
formal portraits of men show them in either court clothing or yoroi hitatare.
Left: A 16th century portrait, said to be of Nawa Nagatoshi, shows the subject
in dark green yoroi hitatare over patterned kosode. The striped kosode of his
attendants peeping out from under their kataginu are easier to see. Right:
Asai Nagamasa appears in layers of brown, red and gold.
 When I
began looking for examples of extant kosode, such as this one in the
Tokyo National Museum , I noticed that the sleeve panels were often much
narrower in proportion to the body of the garment. This is a proportion I
invite you to exploit as needed. If you have a small build, you can cut your
sleeves more narrowly and imitate the correct period cut. Being broad
shouldered and long armed, I used the full width of 16" in constructing my
kosode sleeves so that the overall silhouette hung correctly on me and the
sleeves were long enough. (I'll discuss this further on when we get to assembling
the garment.) The strip of fabric that forms the collar is also fairly wide,
compared with those on modern kimono.
When I
began looking for examples of extant kosode, such as this one in the
Tokyo National Museum , I noticed that the sleeve panels were often much
narrower in proportion to the body of the garment. This is a proportion I
invite you to exploit as needed. If you have a small build, you can cut your
sleeves more narrowly and imitate the correct period cut. Being broad
shouldered and long armed, I used the full width of 16" in constructing my
kosode sleeves so that the overall silhouette hung correctly on me and the
sleeves were long enough. (I'll discuss this further on when we get to assembling
the garment.) The strip of fabric that forms the collar is also fairly wide,
compared with those on modern kimono.
When you look at the construction sketches and the web photos of extant kosode,
remember that these garments are "double breasted." Construction is
symmetrical even if you can't see both front sides because of the overlap.
The sketch at left shows a constructed width of 16" for the migoro (body
panels). Those below assume an uncut fabric width of 17", with each square
equal to 1 inch, making for a seam allowance of 1/2 inch in either direction.
I've chosen to use the 17" width for a couple of reasons. Amanda Meyer
Stinchecum's construction and cutting diagrams of a kosode dating from 1566 CE
in Kosode: 16th-19th Century Textiles From The Nomura Collection are
based upon a piece of fabric 42 centimeters by approximately 860 centimeters
long: 42 centimeters equal 16.54 inches. I've rounded up to 17" to allow
novice sewers to take as generous a seam allowance as they feel comfortable
with, as well as to accommodate the needs of larger Western bodies. (Note again
the exaggeratedly narrow sleeves.)
Step 1: DOING THE MATH: What measurements do I
need?
For
the purposes of this page, I am using US measures in inches and yards. http://www.onlineconversion.com/length_common.htm is
useful if one needs to convert to or from metric measurements. 
The Japanese method of dealing with sizing is to measure the wearer and simply
take a wider or narrower seam allowance. Since the fabric bolt is narrow enough
that they're working with selvaged edges on many of the seams, there is no
cutting down involved. This allows a garment to be dismantled for cleaning or
even resizing to a new wearer.
However, if you are not built like the average 16th century Japanese, it is
essential you take your measurements for the garment pieces you will be making
and write them down.
A gentleman with whom I correspond ran into problems while making his first
Japanese outfit. He realized that he was going to need to upsize and hit upon
the solution, with excellent results. I'm passing it on here. Unless you are
working with a bolt of narrow Japanese fabric, you have the option of cutting
your fabric panels to the necessary size that will fit you. You can
do this by determining your "wingspan."
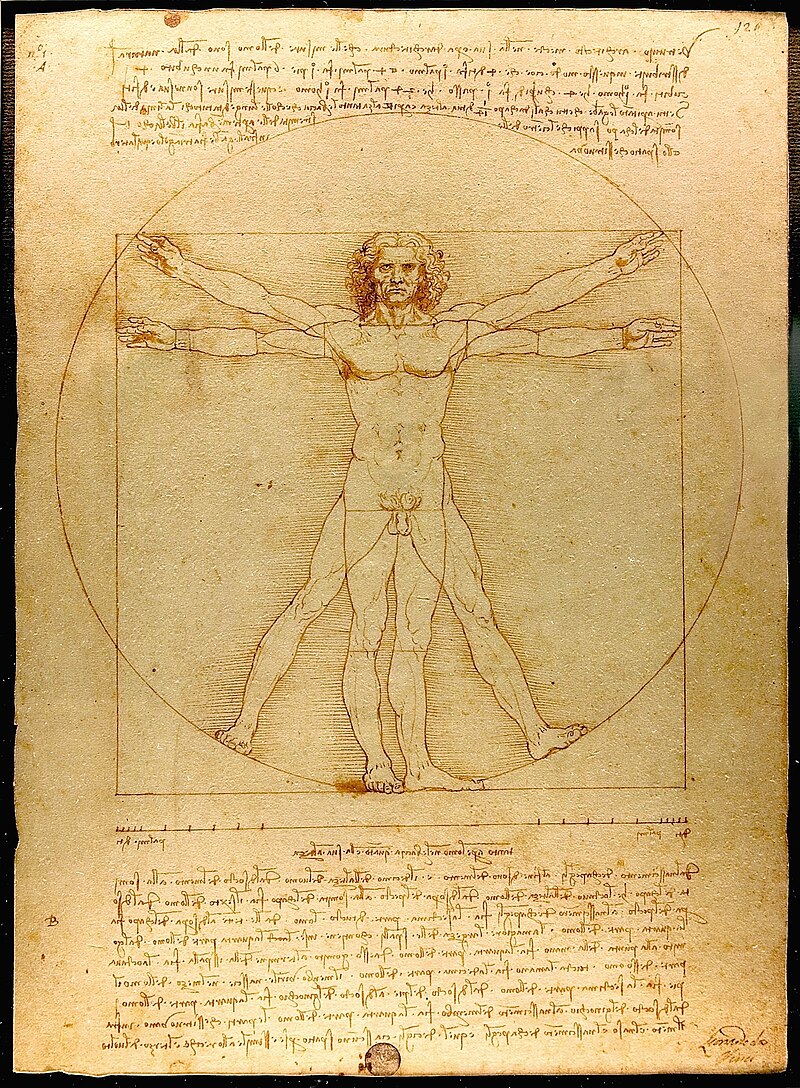
BASE PANEL WIDTH: Extend your arms to either side at shoulder height, imitating
Da Vinci's "Vitruvian Man"
and have a friend measure you from wrist to wrist. Divide this measurement by
4. Add an inch to that amount to give you 1/2" at each edge for your seam
allowances. You now have a base-panel-width to cut your migoro (body) and sode
(sleeve) panels to. The eri (collar) and okumi (overlap) panels will be one
half of your base panel width.
EXAMPLES: Yoshi has a 72" wrist-to-wrist measurement. 72"/4" =
18. 18 + 1 = 19". Yoshi would need a base-panel-width of 19". Yukiko
has a 52" wrist-to-wrist measurement. 52"/4 = 13". 13" +
1" = 14. Yukiko could use a much narrower base-panel-width of 14".
MIGORO
LENGTH: Ask a friend with a tape measure to help you measure the length from
the nape of your neck to the floor as you stand in bare feet. Not sure where
your nape is? Bow your head and feel for the most prominent bump at the back of
your neck: stand up straight again and measure from the top of that bump. Add
one to two inches to that measurement for a hem allowance, then multiply by 2
to get the base length of your migoro (or body panels). This should be ample to
make a kosode long enough to brush the top of your foot.
EXAMPLE: I measure 57" from nape to floor. 57 +1" hem allowance =
58". 58" x 2 = 116." I will need two migoro pieces measuring
116" long by a base-panel-width of 17."
Hakama variant: For men wearing hakama or ladies wearing Heian
nagabakama, you may be prefer less length bunched beneath your hakama: measure
from the nape to the back of the knee, plus 2".
Trailing
hem variant: For ladies who want a more elegant, trailing hem (for
uchikake in particular), add to your base nape to floor measurement based on
how much you want - 10" to 12" is not out of line. The uchikake
should trail a bit, and the kosode beneath it should not be too short - your
obi will assist you in hitching it up to a comfortable walking length.)
 OKUMI
LENGTH: The okumi (overlap panels) are literally half the width of the migoro.
To determine how long the okumi need to be, take your tape measure and place it
on the point of your shoulder. (See photo at left.) Make a fist and find the
edge of your collarbone with your knuckle. In the photo at right, the bottom
edge of my fist is at 8 1/2 inches. Take your final migoro measurement, divide
by 2, then subtract the shoulder-to-fist measurement for the length of your
okumi.
OKUMI
LENGTH: The okumi (overlap panels) are literally half the width of the migoro.
To determine how long the okumi need to be, take your tape measure and place it
on the point of your shoulder. (See photo at left.) Make a fist and find the
edge of your collarbone with your knuckle. In the photo at right, the bottom
edge of my fist is at 8 1/2 inches. Take your final migoro measurement, divide
by 2, then subtract the shoulder-to-fist measurement for the length of your
okumi.
EXAMPLE: My migoro measures 116". 116"/2 = 58". 58" - 8
1/2" = 49 1/2". I will need two okumi measuring 8 1/2" by 49
1/2".
 ERI
LENGTH: The eri (collar) is also half the width of the migoro. To determine how
long the eri needs to be, take your tape measure and loop it around your neck,
crossing it as if it were the collar of your kosode. Place one end of the tape
at your hip, then find the measurement to the other hip.
ERI
LENGTH: The eri (collar) is also half the width of the migoro. To determine how
long the eri needs to be, take your tape measure and loop it around your neck,
crossing it as if it were the collar of your kosode. Place one end of the tape
at your hip, then find the measurement to the other hip.
But I
can't work without a pattern! Some people need the
security of a paper pattern. You can make your own quite easily. You'll need a
pencil or Sharpie, a yardstick, and either several yards of cheap muslin OR a
roll of cheap paper from an art store. If you have to scale up your
measurements as discussed above, make sure the paper is at least as wide the
base panel width unit you came up with. (Do not use old newspapers as you risk
ink rubbing off on your fabric when you try to use your new pattern.)
Using
a yardstick, measure and cut out four rectangles in the sizes below - if you
need help making a 90 degree angle, use the edge of a book, or if you have it,
a T-square or protractor:
- Your measured
base- panel- width x your height in inches from nape of the neck to floor
plus 2" - mark it "body panel" (or "migoro").*
- Half your
measured base-panel-width x your eri measurement - mark it
"collar" (or "eri")
- Half your
measured base panel width x your okumi measurement - mark it
"overlap" (or "okumi").
- Your measured
base-panel width x 15" - mark it "sleeve" (or
"sode"). To add a curve to the outer bottom corner, take a salad
plate
or small dinner plate, line it up with the edges of the rectangle and use it to trace the desired curve, then simply trim the excess."*
* Note
that the "migoro" and "sode" pattern pieces you've just
made are half the length of the fabric pieces you will eventually cut out with
them. Be sure to mark the top edge of the "migoro" and
"sode" pieces to remind you that the top edge is supposed to be a
fold line in the fabric.
(Sewing
novices: save your fabric shears or rotary cutter to keep them sharp. Cut your
paper pattern with a different pair of scissors. I have three pairs of scissors
in the house with different colored handles so I know which ones are for
fabric, which for paper and which for miscellaneous odd materials.)
You
now have a pattern for a kosode. You can use the same pattern for a lady's
uchikake, simply extend the length of the body panel 10 inches or so if you
want it to trail gracefully on the
ground behind you.
You
also have measurements you can use to calculate how much fabric you need for
your garment.
Step 2: DOING THE MATH: How many yards do I
need?
Below is a cutting
layout on 45" wide fabric. Standard modern fabric bolt-widths in the US of
44", 45", and #60" are fairly common, though you may find some
wider or narrower ones
depending on where you shop. Fabric is sold by the yard. One yard = 36".
You can use the measurements you've taken in Step 1 to calculate how many yards
of fabric you'll need for
your garment. Chart out a cutting layout like the one below, plug in your
measurements and calculate how many yards you're likely to need. If you do it
for both 45" and 60" you'll be well
armed when you go fabric shopping.
I tend to overbuy by a minimum of a half yard to a yard on basic general
principle, in case of a cutting mistake or shrinkage. I can usually find some
use for the leftovers anyway.

Step 3: CHOOSING FABRIC
I
encourage you to do some research using period artworks, as well as visiting
the Kyoto Costume museum site to get
an idea as to what colors and patterns were worn in the Muromachi
and Momoyama periods. Please be sure to check the links to extant garments on
the web and the bibliography below. Sengokudaimyo.com has a
section on colors and fabric
that is well worth a look. NEW: Morikawa Rei’s excellent blog post on period Japanese
textiles can be found here.
The
small patterns often found in cotton yukata prints are often TOO small or just
plain wrong. It's pretty hard to go wrong with solid colors and tone-on-tone
geometric damasks. Be honest
with yourself when fabric shopping: if you think you're going to look like Aunt
Edith's Victorian sofa, you probably will. Solid colors are 100% safe and
appropriate if you're at all in doubt. Don't
be afraid of bright colors either! See the links at the end of this article to
artwork from the Muromachi and Momoyama periods showing people of both sexes.
Broad stripes were popular and there is evidence that plaids were big with the
commoner classes. (Ladies, please avoid black. I have yet to find evidence of
women wearing it during
SCA-period, though you'll see portraits of men in black court clothing. If you
like dark colors, indigo and deep browns became very popular as a result of the
impact of Zen Buddhism in Japan.)
Embroidery
and a variety of painting or dyeing methods were used by the Japanese to
embellish their textiles. Depending on how creative you want to get, you can do
the same. I've tried block
printing and stenciling with some success. Be sure to
check out the
Facebook Group Printed Textiles in the
Middle Ages
for more tips and techniques.


In the
16th century pieced and even patchwork garments appear to have taken what may
have been a peasant necessity and turned it into fashion. The red and white
silk kosode (second left)
from the Hayashibara Museum is made of alternating blocks of red and white
plain weave silk, with cherry blossoms stencilled in gold leaf. The brocade and
silk damask "crazy quilt" dofuku
on the right belonged to the Dragon of Echigo, Uesugi Kenshin. The concept
might have another origin: Japanese Buddhists often donated the clothing of the
deceased to temples and shrines.
Pieces of these garments might be used to make a kesa, the striking patchwork
mantles worn by monks, such as this example on the right, from the Tokyo
National Museum. Far left: my
own humble attempt to replicate a dan-gawari kosode.
Silks,
particularly habotai, taffeta or fuji broadcloth, are all excellent choices.
Try to avoid silk noil if you can. Slubs are faults that modern wearers find
"natural" but medieval wearers would've
scorned as shoddy workmanship. I know lots of people like noil because it's
relatively inexpensive and often available in a wide range of colors, but it
has an unpleasant tendency to pill.
Likewise, dupioni suffers from slubs, but machine-woven dupioni is better than
hand-woven, and I confess that I've used it on at least two occasions.
Bast
fibers such as ramie and hemp were available to lower classes (though you may
find that silk is cheaper than hemp in the US). Linen breathes beautifully, is
a good choice for hot
weather, and is generally less expensive than hemp.
There
are arguments for the use of cotton in the 16th century - and its
launder-ability and breathe-ability certainly make it useful, particularly for
the layer closest to your skin. Just be sure to
choose fabrics with sufficient body for their intended use.
Wool
was imported after contact with Europe, but was not widely used by the Japanese
in our period. Try to avoid synthetics. Rayon tends not to wear well and
polyester is just icky, being cold
in winter, hot in summer, not to mention that it doesn't breathe and is
flammable. If you're thinking your budget won't allow you to afford silk, check
out the links below. I've seen modern Japanese
cotton yukata prints at anywhere from $8 to $25/yard at a local fabric shop and
yet I've bought undyed silk habotai for under $6/yard. You can often get undyed
silk yardage at extremely
reasonable prices (particularly if you go in on a purchase with friends and buy
an entire bolt) and dye it yourself. The following on-line sources sell silk
yardage and the first two also sell dyes
and fabric paints specifically for silk. (Avoid Rit dye - it's designed
for cotton, which is a vegetable fiber. Silk is an animal fiber. It makes a
difference.)
http://www.dharmatrading.com
http://www.thaisilks.com
http://www.denverfabrics.com
http://www.fabrics-store.com (for
linen, specifically)
Whether
you are going to sew on a machine or by hand, don't forget thread, some
straight pins and 1/4 yard of medium weight interfacing for your eri. The
scandalous nape-of-the-neck display
achieved by Edo period geisha requires the use of a collar stiffener. While
this isn't appropriate for pre-Edo clothing, I've found that my own eri were
frequently a little too wimpy and prone to
wrinkles. The solution is to add an interior layer of interfacing. Cut it just
slightly smaller than the length and half-width of your eri piece and sandwich
it between the folded halves when you're
ready to attach the eri.
Step 4: GETTING READY TO SEW
Sewing
novices, be sure to wash and dry your fabric before you cut it out. If it's
going to shrink or the dye is going to run, you want that to happen before you
start cutting.
If you
have one of those cutting mats which is already marked with a grid of one inch
squares (worth getting if you plan to do a lot of sewing), you can lay out and
measure your fabric on it
pretty easily as this garment is all rectangles.
If you
used the instructions above to make yourself a paper or muslin pattern,
remember that the body and sleeve pattern pieces (migoro and sode) are half the
length of the actual sleeve and
body pieces so you can double the fabric and cut it on a fold. You need to two
each of the body, overlap and sleeves, and one collar piece.
At right is an
"exploded" diagram of where all the pieces of a kosode fit. I've used
dotted lines in different colors to show points where the pieces are connected.
The reason for the "mess" in the
middle is that kosode, like kimono, are double breasted garments and I couldn't
figure out how to show the overlap pieces (okumi), and the collar layout in a
symmetrical fashion without it.
 Since you have to
cut panels from wider fabric, you do do not have the advantage of selvaged
edges on all your panels as Japanese clothing makers do. Be sure to finish your
seams either by
Since you have to
cut panels from wider fabric, you do do not have the advantage of selvaged
edges on all your panels as Japanese clothing makers do. Be sure to finish your
seams either by
hand or machine to prevent fraying. While none of
these techniques are authentic to Japanese garment construction, french seams,
flat-felling, serging or using seam binding tape will help your
garments last longer!
I
don't understand how these pieces go together! Understandable
- it doesn't look much like a kosode in this state, does it? Print out a copy
of the cutting diagram and cut it up into two
migoro, two sode, two okumi and an eri. Read through the assembly instructions
below and see if you can tape together a paper kosode with the pieces you've
cut. Taking it from two dimensions
into three may help you visualize what goes where before you attack your
fabric. Don't worry if you can't get the eri to lay correctly on your
"paper doll kosode." It'll be easier with real fabric at full
scale.
To
line or not to line? The Japanese wear both lined and unlined garments. Linings
provide warmth to winter weight garments. They also can add body and a spark of
color at edges where the lining
can be seen. If you've chosen a lightweight fabric to work with for your
uchikake, a lining may give it a little more body. The two modern kimono that I
own are lined with plain white fabric in the upper
body, with colored fabric that contrasts with the outer fabric inside the
sleeves and from about the knee to the hem, an option I point out to the budget
conscious. To do a fully lined kosode with swinging sleeves, cut your lining
pieces the same as you would for the outer fabric except the collar (eri).
Assemble the migoro, sode and okumi as described below, then turn both the
lining and the outer kosode inside out to attach at the following points: along
the outer edges of the okumi and up the inside of the collar line; along the
armpit openings, and the back edge of the sleeves. Turn the kosode right
side out and attach the lining to the kosode along the inside of the hem.
Finish by attaching the eri.
Step 4: CUTTING AND ASSEMBLY

 Trade
Secret: The False Back Seam.
Trade
Secret: The False Back Seam.
Well, maybe you DON"T need to cut two of each migoro piece, not if you're
using fabric woven to Western bolt-widths. What you
can do is cut a single double-width body piece, then split it up the center
halfway. Say you've done your math and you've determined
that your migoro needs to be 120" long and each panel needs to be
17". Cut ONE rectangle 120" x 34." Fold it in half widthwise
and use a pin to mark where the shoulder fold would be. Unfold it and refold it
lengthwise. Cut from the bottom edge up to the pin
to form the two front panels.
When it comes time to sew, make sure you have your fabric folded lengthwise
with the "right" sides together. Run a line of stitching
up the fold line to form your center back seam. It needs to be there for the
garment to hang correctly and to provide symmetry, but
since you didn't have to cut there, it's one less seam that needs a finishing
treatment.
If you opt instead to cut two migoro, fold them in half lengthwise. Mark the
midpoint of that length with a pin or chalk and sew
the two pieces together lengthwise from the midpoint to one end, forming your
center back seam (red line in diagram at left). Fold the sleeve pieces in
half lengthwise and mark the midpoint. Pin the sleeves to the shoulders and try
on what you have so far to see where
the shoulder seam is going to fall on you. If you are small, you may need to
take up the sleeves before sewing them on. If you are
bigger, you may need to allow for the full width to give you the proper look.
The Japanese tend not to cut to size, they simply take a
wider seam allowance. It's up to you whether you want to do this or trim the
excess, particularly if you are working with raw edges that
will need to be finished in some way.
 SLEEVE
VARIANTS: Being limited to what the library and the web can offer, I
have not had the opportunity to examine extant garments from the period other
than in
SLEEVE
VARIANTS: Being limited to what the library and the web can offer, I
have not had the opportunity to examine extant garments from the period other
than in
photos. However, my reading tells me that the back edge of the sleeve could, in
some cases be attached to the body or left to swing free, being attached only
at the
shoulder. Certain garments, like a man's dobuku definitely have fully attached
sleeves. In modern kimono, women's sleeves are left completely open at the back
edge
and men's sleeves have the bottoms sewn up part way to form a rather handy
pocket. The open backed swinging sleeve is a great place to show off a
contrasting lining.
If you do a swinging sleeve, you need to attach it about 6-8" down from
the shoulder midpoint on either side. You will either finish by adding the
lining (see above) or
with a rolled hem stitch on an unlined sleeve. For a woman's kosode, do not sew
the back edge shut. For a man's, attach it about 6-8" down from the
shoulder midpoint
on either side as above, then sew the back edge up until you reach the point
where the sleeves attach at the shoulder. If you do a fully attached sleeve,
sew the entire
sleeve seam to the body.
Using
a tape measure, measure your closed fist at its widest point to determine how
big the sleeve opening needs to be. Add another inch or so to be safe. Sew your
sleeve shut from the bottom of the opening to the sleeve back and hem the
sleeve opening.
If
doing swinging sleeves, start your side seams about 12" from the midpoint
at the top of the shoulder and sew all the way to the bottom of the migoro. If
doing an attached sleeve, you can simply
run your seam from the edge of the wrist opening all the way down.
Align the overlap panels (okumi) with the bottom of each front body panel and
run a seam from top to bottom. (Sketch shows one side only.) Use a roll hem to
finish the outer edge of the okumi.
Measure
the width of your neck with a ruler, add 1", and using the back seam as
the center point, mark this measurement. Cut a slight curve about an inch deep
at its lowest point. Find the center
point on the long side of the collar (eri) and match it to the center back seam
at the bottom of the curved cut. Allow yourself a full 1/2" seam allowance
and, starting from the center back, sew the eri
to the body all the way to the body all the way around the curve and down the
open front edge of the migoro until you get to the okumi. Then come back up to
the center back and do the same thing
to the other side. Doing each side from the center down will help you keep
everything symmetrical.

The
next step is a bit tricky. You may want to put the kosode on a friend, a
mannequin or lay it out as flat as you can. Lay the eri (collar piece) as taut
as possible and angle it so that it tapers
toward the unsewn front edge of the okumi without any gaps. (Go back and look
at this extant kosode to
see how the eri comes down at a sharp angle - it's a better example than my
rough sketch!)
Use lots of pins if you have to! This will result in a triangular bit of waste
fabric at the top of the okumi, which can be trimmed off once you're sure
you've got the eri positioned correctly. At this point,
the eri should be centered and stable. Check the symmetry of how you've pinned
the eri across and down the okumi. Make any adjustments you need to, then,
doing each side separately again, start 
sewing the rest of the eri edge down across the angle you've made across the
okumi and down along the okumi edge until you get about 1/2" to the bottom
of the eri.
You
now have 7 1/2" of collar flapping in the breeze. Take the kosode to the
ironing board and set your iron to a "wool" setting without steam.
Press a crease all the way along at 4 1/4" from the
unfinished edge - this should be your midpoint if you cut an 8 1/2" width
for the eri. Now fold the unfinished edge under so it lines up with where
you've stitched the eri to the body and press another
crease. Fold and crease the short ends of the eri so that you have a clean
bottom edge with no raw fabric sticking out. Cut your interfacing to a width
that will fit inside the folded eri: the interfacing
does not have to go all the way to the bottom, but should at bare minimum be
about 1/3 the total length of the eri. Slide it inside the fold, center it on
the center back seam, then put a tack stitch through
the interfacing and the side of the eri that will be on the inside at each end
and at the center.
Stitch
the bottom closed by hand with a neat overcast stitch working from the outside
to the inside, then blind stitch up and around the inside of the collar line,
then finish the other bottom end of the
eri with the overcast stitch. The hardest part is done! All you have to do now
is hem the bottom!
The
obi. Everyone assumes that this is so simple that nobody ever
tells you how to make one! Your obi is simply a long, narrow rectangle of
fabric. For women: the finished width should be 2" to 3"
inches and it should be long enough to be knotted simply around your waist and
have the ends fall to about knee length or a little below. (I find that having
it long enough to go around twice provides
a bit more security in holding one's kosode closed.) For men: the finished
width should be about 4" inches and it should be long enough to wrap
around your waist two or three times and tie with a knot. (You'll be wearing it
over your kosode and under your hakama.) Once you determine how long is long
enough, cut a strip that length plus an inch: 7 inches wide for a 3" wide
obi, 5 inches wide for a 2"
wide obi, 9 inches wide for a man's 4" wide obi. Fold it in half
lengthwise. If you use an iron to press the edges inward first, you can sew it
without the annoyance of having to turn a long skinny tube of
fabric inside out to finish the unsewn end. To add crispness, particularly with
lightweight fabrics, buy an equivalent amount of interfacing at your local
sewing store and put that between the two sides
before stitching it closed.
Trade
Secret: The eBay Obi Makeover. See that pretty
green obi in the photo just below this paragraph on the right? I bought it on
eBay. Do your search on "hanhaba obi" or "han haba obi".
Hanhaba obi are half the width of modern formal obi and are usually used with
women's yukata. However, yukata with fancy hanhaba are frequenly worn by
festival dance troupes and you can occasionally find some of these for sale on
eBay. Don't bother with the plain ones that are different colors on each side -
look for the ones made out of synthetic brocades as they often use design
motifs that are period-appropriate. Check the seller's photos to see if they
appear to be made of two lengths of fabric sewn together, because that's what
you want. If you find one and win, simply use a seam ripper to carefully
separate the front fabric from the backing. Fold the fabric lengthwise and sew
it back together. If the backing fabric is just as nice, you've just gotten two
obi for the price of one.
That
layering thing. Kosode were often worn in layers. An
undergarment-weight kosode is a good idea to wear under anything else as it'll
save your outer layers from sweat. (See photo at right.) My silk kosode rarely
require anything more than occasional spot-cleaning as I always wear a
laundry-friendly layer made of cotton or linen beneath them.


More
layers on a cold day will keep you warm. And on a hot day, the Japanese already
have a way to fake layers at the collar line, the eri sugata. Don't pay big
bucks to import one from Japan,
simply make one or more eri in complimentary or contrasting colors that you can
pin to the inside of the eri on your finished kosode so that the edges peep
out, giving the illusion of another layer
below. (Above: a two layer eri-sugata -
which I put on wrong-side out because the red provided higher contrast in the photos.
I generally pin the crossed ends to my sports bra.)
To
make: Cut a rectangle of fabric 8 1/2" x 36" - if you are taller or
smaller than average, I suggest looping a tape measure over your neck like a
kosode collar and measuring the distance of the
loop to where it crosses at the bottom of your bra and using that measurement.
(Men, find a spot just below your pectorals and use that.) Fold half
lengthwise, press the edges inward and sew it
shut as you did with the obi. You may also want to add interfacing to get a
smooth lying collar, particularly if the fabric is thin or drapy. I suggest
safety-pinning it to the inside of your innermost kosode
layer, or you could sew a couple of snaps in place. It beats having to take a
seam ripper to it if you want to launder just the eri sugata. (Don't use Velcro
- it'll be itchy if you opt not to wear the eri
sugata all the time.)
If you
opt for multiple layers, you do not need obi for the inner layers that will not
be seen, but you will need himo (ties) to hold each under layer closed. A himo
can be a random strip of fabric long
enough to tie around your waist. If you don't have scrap fabric to make them
out of, pick up a package of bias tape. The 7/8" width used for quilt
binding is perfect - simply cut it to the length you need.
Other
ways to wear your kosode. Koshimaki is the Japanese
equivalent of wearing your sweater tied around your waist. Our samurai lady on
the left has wrapped her uchikake around her waist for a hot day. (Note the
spiffy red lining of her uchikake.) Do you live, as I do, in a kingdom where
you're forced to take shade where you can find it? Katsugu refers to the
practice of using a kosode to cover one's head, sometimes even topping this
impromptu veil with a straw hat. The lady on the right even has an extra obi to
hold her kosode around her shoulders. (In this instance the red obi symbolizes
purity on pilgrimage!)


Putting
it on. While it seems counterintuitive to Western wearers, always
wrap your kosode left over right - and don't be alarmed at the size, it should
wrap all the way to your hip easily at this size,
as you can see in the photo above of the lady with the light blue kosode on her
head (Right over left is for the dead. Yes, really.) Your obi goes on at the
waist and, for ladies, ties with a simple knot
in the front. DO knot it - it's the only thing holding your clothing closed.
Men, you'll tie yours in the back. Most likely you'll have hakama* on over it.
The front hakama ties get tied in back first, then the
back ties get tied in the front. The obi and hakama knots in back provide that
pouf you see in the back.
With
an extra long uchikake, show off indoors by wearing it loose and open and
letting it trail. For outdoors, hike it up and let it blouse over your
obi.
*Patterns
for men's hakama and a yoroi hitatare can be found at: https://sengokudaimyo.com/garb/patterns
Hair: Ladies, click here to
see a survey of traditional Japanese hairstyles from the Kyoto Costume Museum.
If you have long hair, part it in the center and wear it in a long, loose
ponytail tied with a
simple white bow. The Japanese used hair ribbons made of paper. You can
sometimes find paper ribbon through craft stores. Give it a try, it doesn't
look half bad.
If you
decide to use a wig, be sure to sew some combs into the wig's cap if they
aren't already there. Pin it securely to your own hair and try bowing as deeply
as you can in it before trying do do so
in public to avoid potential embarrassments. The 5 foot long wig I purchased is
quite hot and heavy and those combs and pins make all the difference. So did a
can of Static Guard to reduce the
inevitable cling of synthetic fibers to silk clothing (not to mention
detangling the wig after use). The chopsticks in the bun look is Just Plain
Wrong. The Chinese-inspired, elaborate hairstyles we often associate with Japan
became fashionable during the Edo period (1603-1867 CE).
Gentlemen
often have fewer options when it comes to trying to replicate period
hairstyles. The shaved head with the tea whisk ponytail may have become
fashionable as a way to look mature. Long
hair tied up neatly is good for a formal look. (If you can figure out how to
get it to lie in a proper samurai "tea whisk" tell me how you did it
and send pictures and I'll be glad to add it in here. You can
hide a multitude of sins under a kasa or eboshi (see the notes on Accessories
below).
Cosmetics: White
skin, red lips and believe it or not, black teeth were marks of beauty in
medieval Japan. Aristocratic ladies shaved off their eyebrows and painted in
new ones high on their forehead.
I don't recommend shaving off your eyebrows! However, a good grade of white
pancake makeup and bright red lip color will help you achieve the look. So will
darkening your teeth with tooth black.
If you don't believe me, go rent "Ugetsu" or "Throne of
Blood." Better yet, visit this interesting link on Noh masks. You can
often find good white pancake and even a white foundation where the local goths
shop, or start browsing the internet for theatrical suppliers. Paint-on tooth
black starts showing up in stores around Halloween, messy to apply, but
achieves the effect.
Accessories
for men and women: Geta (wooden clogs) are 4 wheel drive for your feet.
Specifically for getting around in the mud, they require only a little practice
to get used to walking in. They
would NOT be worn indoors. Zori or setta (flat thonged sandals) are fine for
most conditions (particularly indoor SCA events where you really don't want to
be walking around barefoot or in tabi) and
the "rustic" styles here are the least glaringly modern ones I've
seen to date. Waraji are the tie-on straw sandals one frequently sees in
samurai portrayals.
Tabi
became fashionable later in period, so you can opt for them or not. White looks
the most elegant for ladies, however, colored tabi were worn, some even
patterned. If you're not the DIY type, I
suggest going with the fitted fabric ones and sewing tapes to them to tie them
on instead of using the modern hooks at the back for a period look. The knit
sock type are completely modern.
The
average souvenir grade paper folding fan isn't quite right, but good sensu from
Japan are very expensive. I have been experimenting with making period-style
folding fans. In the meantime,
make do with a paper folding fan with a simple design. Japan gets hot summers
and both men and women carry fans. They're also wonderful for a lady to
modestly hide behind. You can find geta,
zori and tabi from a variety of Asian gift sellers on the web. Bokunan-do
carries authentic Japanese hats and other garments and accessories. They're not
inexpensive, but they're certainly worth a look.
And don't forget eBay.
Please
visit Samurai For The SCA Guy, a gallery of Japanese clothing by SCA guys and
gals. If they can do it, you can do it.
Can you spot the period garments reproduced in this scene from Akira Kurosawa's
Kagemusha? I stumbled onto this screenshot at
http://www.ninjadojo.com/Kagemusha/Kagemusha006.jpg
Links
and Resources:
The
Costume Museum, Kyoto, Japan http://www.iz2.or.jp/english/ or
the Japanese version at http://www.iz2.or.jp/index.htm
An
Online Japanese Miscellany by Anthony J. Bryant https://sengokudaimyo.com/
Tony also is THE Japanese Armor God of the SCA and has written several titles
for the Osprey military history series.
Some
extant period clothing on the web:
Kosode,
paulownia and bamboo design on light brown twill weave ground, Muromachi
Period, 16th century, Tokyo National Museum.
Surihaku
(Noh costume) kosode, gold leaf on silk, Momoyama Period, 16th century. Tokyo
National Museum.
Nuihaku (Noh
costume) with lilies and oxcarts, Momoyama period, 16th century,Tokyo National
Museum.
Kosode With
Snow-Laden Tachibana Orange, Momoyama period 16th century, Kyoto National
Museum.
Artwork:
The Maple Viewers by
Kano Hideyori, Muromachi (16th century), Tokyo National Museum.
Everyday people enjoying nature. Plaid is period! Wonderful plaids, stripes,
and a man in a cloud patterned kataginu kamishimo that looks unnervingly like a
camouflage print.
Genre scenes of the
Twelve Months, Muromachi (16th century), Tokyo National Museum. If
you examine the scene that opens this section, you'll see young people batting
balls with decorative rackets. Both girls and boys are shown in a variety of
patterned, striped and checked garments. Closer enlargement even shows
placement of sleeve and back seams, particularly on the boy at the left of
center running to hit a ball near the tree. Other scenes show ladies wearing
kosode katsugu-style and a fashionable kosode merchant's shop.
The Tale of Monkeys,
Momoyama, 16th century, British Museum. This
satiric scroll shows what the well dressed monkeys of fashionable 16th century
Kyoto were wearing at weddings, tea ceremonies, poetry contests and feasts.
Books:
Dalby,
Liza. Kimono: Fashioning Culture. Seattle: University of
Washington Press, 2001 (ISBN 0-295-98155-5). This is a good overview of the
development of traditional Japanese dress. If you are interested in the Heian
period, an entire chapter is devoted to the color combinations a fashionable court
lady was expected to wear. Highly recommended.
Hickman,
Money L. Japan's Golden Age: Momoyama. New Haven: Yale
University Press, 1996 (ISBN 0-300-09407-8). This was published in conjunction
with a museum exhibition some years ago. It includes color plates with genre
scenes of daily life, portraits (of women, in particular) and extant kosode,
all worth having a look at if you are interested in late period Japanese dress.
Minnich,
Helen Benton. Japanese Costume and the Makers of Its Elegant Tradition. Tokyo:
Charles E. Tuttle Co., 1963. A bit outdated, but still worth knowing about.
Noma,
Seiroku. Japanese Costume and Textile Arts. New York and
Tokyo, John Wetherhill, Inc. and Heibonsha, jointly, 19774 (ISBN
0-8348-1026-3). If you could only buy ONE book on Japanese costume, this is it.
Moderately priced and fairly easy to find used on the internet, this nice
little book has lots of good photos of kosode, including examples owned by such
historical figures as Uesugi Kenshin and Tokugawa Ieyasu.
Smith,
Bradley. Japan: A History In Art. Garden City, NY: Doubleday
& Co., 1964.
Stinchecum,
Amanda Meyer. Kosode: 16th-19th Century Textiles From The Nomura
Collection. New York: Japan Society in association with Kodansha
International, 1984 (ISBN 0-913304-18-2). Nomura Shojiro, born in the 19th
century during the mad Meiji rush to Westernize, collected and preserved a
number of kosode from before 1600. Some, in fragmentary form, he mounted on
screens to give the illusion of complete garments. This book is a textile
geek's dream if you like the minutiae of fabric weaves, knowing how certain
dyes are made, or what the difference between surihaku, shibori and tsujigahana
are. Or you can simply enjoy the full color photos of the collection.
Yashiro,
Yukio. 2000 Years of Japanese Art. New York: Harry N. Abrams,
Inc. 1958
Fabrics
and dyes:
http://www.dharmatrading.com for
silk yardage, dyes, paints.
http://www.thaisilks.com for
silk. Their brocades are very Chinese (modern) looking, but they carry some
very nice silk jacquards.
http://www.fabrics-store.com for
linen in a variety of weights and colors.
Accessories:
eBay is often a good place to shop for geta, zori, tabi,
fans and fabric. Do a little homework to be sure the item is what you want, set
your spending limits and stick to them.
Bokunan-do carries
clothing and accessories, including festival wear and items for the re-enactor,
including hats. Check out the "Warring States & Edo Period"
section. Be prepared to deal with shipping prices from Japan, but they're a
pleasure to do business with.
Questions?
Comments? Cries for help? I can't fix it if you don't tell me. Email me at wodeford@yahoo.com
Photos
of the author were taken on September 26, 2004 at the Japanese Tea Garden in
Golden Gate Park, San Francisco, California by G. Richard Auklandus.
Photo
of Fujimaki Tosaburo Hidetora (James Strowe) by the author, August 2000.
Copyright
2004, 2006, 2009, 2024 Lisa A. Joseph
This site has been ad free for 20
years. Why not help support this site with a Paypal donation
to https://paypal.me/lisajoseph1561?
No HOBBY LOBBY products were used in these projects.